I admit, this is not a very flashy title for this blog, but there are always those of us out there who need to persist features to shapefiles in some form or another in our applications, at least while they are in the midst of migrating from legacy systems to modern ones.
This post is another chapter in a series of migration topics regarding moving application functionality from ArcObjects Java to Runtime Java.
I recently experimented with exporting a set of points from the Map to a local shapefile, using the 1.0 version of the ArcGIS Runtime SDK for Java. I found that with a bit of ArcPy and a local geoprocessing package, I was able to come up with an approach for accomplishing this task. However, I know there is more than one “right” approach to doing something like this, so my disclaimer here is that I won’t promote mine as a best practice. It could be close, though, and if you are interested, I hope the following provides you with some help!
A few prerequisites before we begin
I needed to have ArcGIS 10.1 and, of course, the ArcGIS Runtime SDK for Java 1.0. I used Eclipse with the ArcGIS Runtime SDK plugins installed, and I used JDK 7. JDK 6 would have worked as well. The source code for the AddGraphic sample also came in real handy. By the way, I highly recommend importing the SDK samples source code into your Java projects, whether using Eclipse, Netneans, or whatever. These provide excellent spring boards for your app building efforts.
The approach
The goal of this experiment, as I mentioned, was to take some simple graphic points and write them to a local shapefile. The 1.0 API does not present a way of doing this directly, but like many “seemingly” complex GIS functions, the GP framework within the Runtime can save the day for you.
Since my experimental Runtime Java program was going to require a “local” geoprocessing task to write the shapefile locally, I needed to create a Geoprocessing package. These are new at 10.1. To do this, a geoprocessing tool or model needs to be executed from within ArcMap/ArcCatalog to produce a “result”, which can then be packaged up into a .gpk file. You can read more about Geoprocessing in the Runtime here.
Back to my scenario, it goes like this:
- Select all the points in a graphics layer
- Add each of them to a GPFeatureRecordSetLayer parameter object
- Execute the local geoprocessing tool.
I wrote a very simple Python script that takes as input the collection of graphics and the name of the shapefile path. The graphics are copied as features to a shapefile on the file system.
import arcpy
from arcpy import env
import os

features = arcpy.GetParameterAsText(0)
outFeatureClass = arcpy.GetParameterAsText(1)

# Set local variables
arcpy.CopyFeatures_management(features, outFeatureClass)
Creating the GP Package
In ArcCatalog, I created a custom toolbox and added my script to it.

I added 3 parameters to the script:
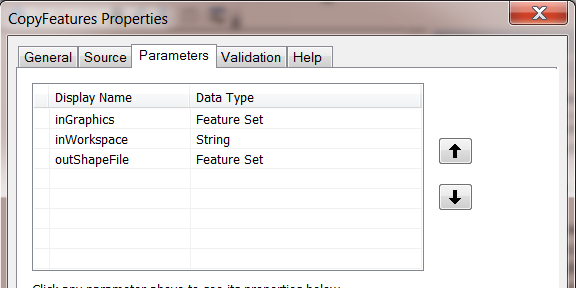
From my custom toolbox, I simply executed the script and created a geoprocessing package from the result. Opening the “Geoprocessing–>Results” window in ArcMap, you can right-click on the results node and save it to a geoprocessing package.

Now my application will be able to execute the same script by accessing this .gpk file at from within the sampe, defining the input parameters, and calling execute on the script.
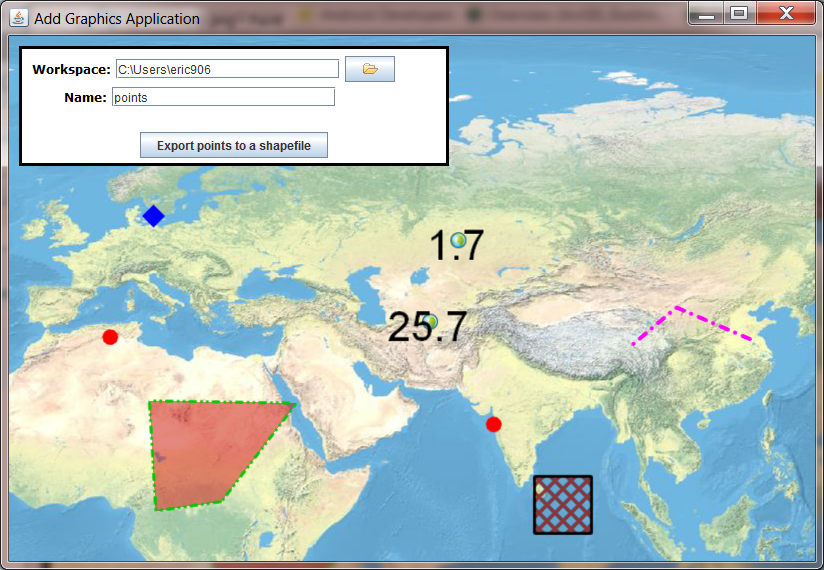
I decided to use the AddGraphics sample as a base for this sample application, which will be shared soon. This adds point, line, and polygon graphic elements to a GraphicsLayer in a Map. I modified this sample to present the user with 2 inputs: one for the shapefile workspace and one for the shapefile name itself. Nevermind the quality of this gnarly Swing code “hack”, the point is to get the info from the user as to where the shapefiles will be written to.
The Code
Let’s dive into some code and have a look at the flow of logic.
First, we need to spin up a LocalGPService using the geoprocessing package file we created earlier. The script is inside of the .gpk file and is made accessible as an internal Web Service when the LocalGPService is started. The execution of the script happens asynchronously, so when the service is started, we then create a geoprocessor to execute with our parameters.
 if(localGPService !=  null)
    	LocalServer.getInstance().shutdown();

localGPService = new LocalGeoprocessingService("C:\Users\eric906\CopyFeaturesModel.gpk");
localGPService.setServiceType(GPServiceType.EXECUTE);

localGPService.addLocalServiceStartCompleteListener(new LocalServiceStartCompleteListener(){

		@Override
		public void localServiceStartComplete(LocalServiceStartCompleteEvent e) {

				if(e.getService().getStatus() == LocalServiceStatus.STARTFAILED){
					System.out.println(e.getService().getError());
					return;
				}

				write(localGPService);

		     }
               });

 localGPService.start();
Notice the code in the localServiceStartComplete method of the Listener class. If the service was started successfully, the script in the GP tool is ready to be invoked. Here, I call the write() method.
Taking the inputs from the GUI, the point graphic elements from the GraphicsLayer are added to the GPFeatureRecordSetLayer GP parameter:
final Geoprocessor geoprocessor = new Geoprocessor(localGPService.getUrlGeoprocessingService()
	                + "/CopyFeatures");

List parameters = new ArrayList();

// Here is where we collect the point graphics from the graphics layer and add
// them to a GPFeatureRecordSetLayer parameter...
GPFeatureRecordSetLayer gpFeatureSet = new GPFeatureRecordSetLayer("inGraphics");
gpFeatureSet.setGeometryType(Geometry.Type.POINT);

ArrayList graphics = new ArrayList();
for(int i : graphicsLayer.getGraphicIDs()){
	Graphic g = graphicsLayer.getGraphic(i);
	if(g.getGeometry().getType() == Geometry.Type.POINT){
	        graphics.add(g);
	}
}

gpFeatureSet.setGraphics(graphics);
I also specified the shapefile name and file location and put that value in a GPString parameter object. Now, using these parameters, I call executeAsync and get the result.
// Here is where we specify the output name and location of the shapefile
GPString output = (GPString)geoprocessor.getGPTaskInfo().getParameters()[1].getDefaultValue();
output.setValue(location + sep + shpFileName);

 // Add the parameters...
parameters.add(gpFeatureSet);
parameters.add(output);

// Now, execute the GP tool....
geoprocessor.executeAsync(parameters, new CallbackListener(){

	@Override
	public void onError(Throwable e) {
		JOptionPane.showMessageDialog(.....);
		return;
	}

	@Override
	public void onCallback(GPParameter[] params) {
		if(params != null){
			JOptionPane.showMessageDialog(.....);
		}
	}
});
That’s about all there is to it.
In summary
Give it a try. if you need to export to shapefiles from your Runtime apps, the process you can follow is…
- Write your Geoprocessing script to take in a collection of graphics and a shapefile output name and location. You can use the one I described in this post.
- Execute the script in ArcMap so that it produces a successful result.
- Create a geoprocessing package from the result. ( a .gpk file).
- Extend an out-of-the-box sample that puts points on a map by writing code to:
- Iterate through the points and add them to a GP FeatureSet parameter.
- Execute the GP script.
Keep an eye out for the sample app and source code to be posted on the Resource Center very soon.